 Dates take the format Day-Mth or Mth-Day (Depending on the Region).
You can enter the date in a few forms to make it easy for you. The following formats will result in the date being displayed (in this example) as 9-Nov:
And if you are in the current month (i.e. Nov) then you only need to type the "day" in,
All will return the date 9-Nov
 Money In represents the money you are receiving from your customers as well as Money in from Non Sales sources, such as loans.
Click the Money In area and the screen will expand allowing you to record Money In transactions.
These transactions will usually come in the form of sales.
You may receive other forms of money. If your receipt of money is NOT for sales (or Income) then you should describe the transaction to identify it and record the transaction under a column header other than "Sales". Otherwise you run the risk of the transaction being treated as Income and you'll end up paying tax on it. If the transaction is not income, then ensure a column identifies it as such and make sure the column "X" is engaged.
It's always a good idea to record a description to receipts that are NOT sales or Income, simply use the description box.
Always ensure the GST/VAT calculated is correct. They can vary from time to time due to rounding variations or different treatment of income types. The system will automatically calculate the GST/VAT, check it and, if different, change the amount to the correct amount.
NON Sales or Income receipts should NOT have GST in them and you should change any automatic GST/VAT calculation to ZERO.
If you are generating Invoices from the system your Invoices will be marked "Not Paid" until you action them. By simply clicking the "Not Paid" button you will be given an option to transfer the amount to "Money In". This saves you recording the entry again into Money In.
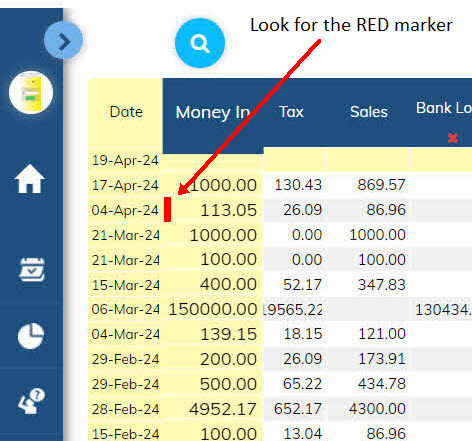
We all make mistakes so it's cool to know you can simply delete any transaction.
Find the row where the error occurs. To the right of the date field you'll see a Red Box appear.
Simply click the RED marker and that transaction row will be deleted.

This is the area where you enter the name of the business or person you paid money to.
You are NOT limited by the size of the text box. Just record the full name.
Only a portion of what you type is visible on the Home Screen. To see the full text of what you have written, simply hover your mouse over it.
The system remembers the name so next time you make a payment to the same business the name will populate after you type the initial letters of the name.
 GST/VAT is automatically calculated for both Income and Expenses based on your original setup.
Be AWARE that there can be some variances to the calculation of the Tax, so you need to check your Invoicing or your receipts to verify the correctness.
Depending on your region, some transactions, such as interest and bank charges, do not attract GST/VAT.
If the GST/VAT is not correct or should be zero, simply select the box where the GST/VAT appears for that transaction and enter the correct value.
 Column headers (expense types) represent the types of expenses your business deals with. By grouping your payments under specific expense types, you can analyse your results to show where you are spending your money.
This helps you make decisions.
You have a choice of up to 13 MONEY OUT Column Headers (expense types) to be selected from a pre-defined list appropriate to your business type. If the expense type is NOT listed, select the edit function on the column header and change to the expense type you require.
The system is DELIBERATELY limited to 14 expense types. You also have one "Other Expenses" column that fits everything else.
It may seem frustrating to limit this, but you will find more meaning and better management by sticking to this limit. Users typically struggle trying to assign a payment to an expense type. Don't stress it. If there is no HEADER then just use the default "OTHER EXPENSES" to list your payment. By using "Other Expenses" you will be required to write a detailed description of the payment for future reference.
HOW TO CHANGE A HEADER
Simply move your mouse over the existing Column Header and Click. Then type in the new category label and accept.
MONEY IN
You MONEY IN columns are limited to four Columns, they are not initially displayed. Click the "+" symbol to add more column.
WHAT NOT TO DO
When choosing column headers (expense types), choose the ones you expect to have the most transactions in a year. Do NOT choose headers where only one or two transactions occur during a year. For those transactions use "OTHER EXPENSES" and describe the transaction. This will allow you to have useful column headers for your most frequent expense items. If you DON'T do this, there's a good chance you will run out of useful Column headers and your "Other Expense" column will have so many transactions that simple interpretation will be unachievable.

 This is your second way to enter your Income and Expenses. The first is directly through the Home Screen and the third is through the eCashbooks Mobile App.
SELECT INCOME (Money IN) or EXPENSES (Money Out)
Select whether you are entering Income or Expenses through the top TABs.
Enter your transaction details in the boxes shown.
Be sure to write a Description IF the category doesn't describe the Money In or Money Out.
For instance you don't need to waste your time writing "Bank Charges" as a description if the Column Header is "Bank Charges"
Descriptions are there for your understanding of the transaction in the future or if your accountant asks "what is this?".

 The eCashbooks Mobile App complements the website to enable you to undertake critical transactions whilst away from your desk.
The App will provide you with a summary snapshot of how you're performing and has the following functions:
Reports and more in debt functionality is contained on the main site.
All transactions recorded on the App are synced to your web-based system. This makes it easy to record transactions when you are out and about. The App mirrors the web-based system so it should be familiar to you when using.
Your Log In on the eCashbooks website is the same for the Mobile App.
You need the eCashbooks App. Gst your phone out and scan the QR code now.

 Descriptions to describe your transactions are only compulsory in a few circumstances.
A description pop up will appear for you to complete.
As a general rule, the use of the DESCRIPTION FIELD should be kept to a minimum and should only be used where the expense you have paid cannot be adequately understood by the name of the business you are paying and the Column Header you are placing it under.
For Instance:
A description would be required for AMP Insurance $1,237
That notation doesn't describe the type of Insurance, so a description of "Life insurance" would identify the nature of the payment.
Something like BP Fuel $87, would not require a description, as clearly you can see what it is.
Why Bother with Descriptiona at all?
The chances are your accountant or tax return will require information about the payment. So better off doing it now than digging it up later.
 You will use this column where NO OTHER column header describes the expense payment.
As this column has no description of the expense, you will need to add a description to describe the payment.
The purpose of having a description is to create an understanding of what the transaction represents. That's so you'll know what the transaction was for, when you're asked in the future by your accountant or even yourself.
The DESCRIPTION field is COMPULSORY, so you CANNOT move to the next transaction until it is completed.
 The REPAIR column has a COMPULSORY description field.
This is because of the various ways both Accounting and Taxation treat repair expenses.
So thoroughly describe the repair you've just paid for so a determination can be made as to how it will be treated.
As a COMPULSORY description field, you CANNOT move to the next transaction until it has been completed.
 The MONEY OUT column is simply the total amount you have paid to your provider/supplier. In accounting jargon, it is generally represented by payment of EXPENSES. Money Out can also represent payments for Assets, loan repayments and other Non Expense items. Essentially if you spend Money, you need to find a home for the transaction here.
Write the name of the supplier or who your payment is going to.
The Total Amount of the payment you've made.
This will self calculate according to your preset TAX RATE. If for some reason the amount of Tax calculated is different then simply edit the Tax Amount.
Find a Category Header that represents the payment type and enter the net value (Total amount - Tax) under the column. If no Category Header exists for the payment type then add to OTHER EXPENSES and provide a description for the transaction.
 This is your way of showing Financial Performance in terms of a Profit and Loss Statement rather than a Cash Statement.
The Cash Statement (refer reports menu) represents all the Money In and Money Out that have gone through your books for a specified period. There is no distinction between what may be a capital expense or an ordinary expense.
The Profit Statement (refer reports menu) attempts to give you an idea of profits from your business by excluding payments that generally have a life beyond the current year.
As an Example
A Capital expense would be a payment made for an item that can be used beyond a financial year. So it could be a $50,000 piece of equipment that will last you for five years. If you just expensed that item in the current year, it would distort your profit for that year.
To overcome that distorting, without going full stream accounting, you can just choose to "Untick" that column and the amounts in the column will not appear in your Profit Reports. That simple, then at year end your accountant can sort out the correct accounting allocation.
By selecting "X" for a Column, the amount will be excluded from Profit Reports but still appear in your Cash Reports. This is typically used for Loans received and significant Asset Purchases.
Use a FUTURE DATE to record your Accounts Payable.
eCashbooks is